
Making your First Model (For 3D Printing!)

What are we going to do?
In this tutorial, we will learn how to:
-
- Create a basic blob shape using primitives
- Use extrusion and sculpting to refine the form
- Add simple details like eyes, legs, or ears
- Use Boolean modifiers to cut pieces out of an object
- Prepare the model for 3D printing
Setting up Blender for 3D Printing
- Open Blender and set the scene scale to real-world units:
- Go to Scene Properties (teardrop icon on the right) > Units > Metric and change it (millimeters are best for 3D printing, but I like to use centimeters for art projects
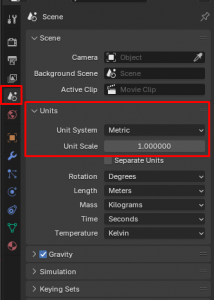
- Go to Scene Properties (teardrop icon on the right) > Units > Metric and change it (millimeters are best for 3D printing, but I like to use centimeters for art projects
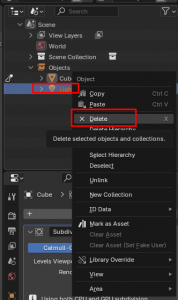
- Delete the light and camera objects in your scene hierarchy (should be located in the top right corner of your screen)
Try (and remember) these keys out:
- Middle mouse button to move around the screen/look at different angles of the object. Hold down the middle mouse button and drag. On a laptop, there may be no middle mouse button. You may have to use two fingers on the touchpad and drag (you can also potentially use the touch screen).
- Shift + middle mouse button to drag the entire screen around (move the camera without moving the angle of it).
- Scroll wheel to zoom in or out. On a laptop, you can drag your fingers out on the touchpad like you are zooming in.
Creating the Blob Shape
- We will be using the default cube shape, however, it starts at a very small size. For a rule of thumb, I usually scale it x10.
- Zoom out, click on the cube, press the S key, and type in 10 on your keyboard, then click off of the cube. This will make & set the cube to be 10x the size it previously was. Another way to scale is to press the S key, and drag your mouse outward.
- Apply Subdivision Surface Modifier to make it rounder.
- Modifiers Tab → Add Modifier → Subdivision Surface.
- Use one level of subdivision for now.

- Click on the little drop down arrow and apply the modifier. This will make the shape "permanent". When you use a modifier, if you do not apply it it is only visual but not a direct change to the mesh.

- Click on the cube and click on object mode in the upper left-hand corner and change it to edit. We will be changing the mesh slightly to give it a "chubbier" look.

- In the corner of the screen, next to the edit mode, you will see three small buttons. The first is to edit the "points" of the shape. The second is to edit the edges. The third is to edit the entire side of a shape.
- We will click on the third option for now and edit the entire side of the shape.
- In the right hand corner, you will also want to enable symmetry on the X axis so our model is symmetrical. Click the little X button shown below to do this.

- When you click on a side of the object, it will highlight it orange. This means it is selected. Highlight the side shown below.

- With the side still selected, press "G" on your keyboard, and then "X" right after. G is the shortcut for grab (this allows you to move what you have selected), and X locks it to the X axis, so we move it only to the right or left, instead of in a random direction.
- Move your mouse outwards. This will give our blob creature "cheeks"!

- We will add another subdivision modifier, so we can make our little blob super smooth now. This time, we will add 5 levels to the viewport, and then apply the modifier.


- Our blob creature has a head now! Yay!! We will sculpt and add some features onto it next, so our little guy has some eyes and a mouth!
- In the same place you swapped to edit mode, we will change to sculpt mode this time.

- Look at all these cool brushes we can use! Mine are at the bottom, but in some versions of blender they will be on the left. Lets select the blob brush and give our little friend some eye sockets!


- Once you click on the brush, you can click on the minus button on the top bar, by the brush setting. This will make the blobs push into the model, rather than paint blobs onto it.

- Now, think about where you want your eyes to go, and paint onto your blob! Here is where I put mine.

- Play around with the brushes. You can add some more detail to your creature! I used the crease tool to add a mouth crease, and also brought the bottom of the face out a bit with elastic grab. Please keep in mind, since we are 3D printing these, you do not want weird overhangs, super thin pieces, or floating objects. If your blob is too "pixelated" you can add another subdivision surface modifier to make it smoother for adding details.

- We will give him some eyes next. Switch back to object mode, and then use Add > Mesh > Cube.

- Switch into edit mode and make the view transparent (so we can see into our friend's head) with the "box" icon I circled in red in the upper right hand corner.
- Bring the cube forward using "G" and "Y" then bring the cube up using "G" and "Z" until it is centered between the eyes.


- Add a mirror modifier, which will mirror your changes on the opposite side, then use "G" and "X" to bring the cube into the eye socket of your little creature. Keep moving it around and using "S" to scale it until it seems like it is "in the eye socket"


- Next, I added a subdivision surface modifier with 4 viewport levels to make the object round. I did NOT apply it this time. You will be able to see the round shape of the eye, but also that the geometry of the object is still a cube. This lets us keep editing the eye more easily.


- I also used "S" "Y" to make it thinner, then used "R" and "Z" to rotate it a bit to match the angle of the eye socket better.


- Now, our little friend has eyes!

- You can use the same steps as the eyes above to make some ears for your little friend. I decided to make him some kitty cat ears!

- I used add > mesh > cube on the top bar to add a cube, like the previous steps showed for the eyes.

- I used used the keyboard combo G and Z to move the cube to the top of the head.

- In the toolbox section on the right, I added a mirror modifier (so we can have two ears, instead of one!)

- I then switched from object mode to edit mode to move my cubes.

- I scaled the cube up with S, then used the keyboard combo G + X to move the cube to the right side, and R + Y to slightly tilt them.

- Now, with face-select mode toggled up (shown in the above image):


- I selected the top face of the ear, and used E on my keyboard to extrude outwards, then s to scale it slightly smaller. You can adjust as you wish, depending on the ears you want to give your pal. Remember not to have steep overhangs, or they will noodle on your printbed!


- I then added a subdivision modifier (just one for now, that I am not applying yet).

- Using face-select mode, I selected ONLY the front three faces on the ear.

- I then used I(i) on my keyboard to add an inset to the model. Leave the inset faces selected for the next step.

- Now, using E on my keyboard, I extruded into the ear. Make sure to pull towards the back of the head, and not forward, to make this dent for the inside of the ears!

- Time for some more subdivision!! In my modifier, I changed the levels viewport to '5'. This will make it super smooth.

- Here is the result of our work!! You can also add extra details, objects, or fluff on as you wish using the same skills we learned above.